Xây dựng 17 mẫu AI agent và vai trò của chúng trong các hệ thống AI quy mô lớn

Khi xây dựng một hệ thống AI quy mô lớn, bạn thực sự đang kết hợp nhiều mẫu thiết kế agent (agentic design patterns) khác nhau. Mỗi mẫu có giai đoạn, phương pháp xây dựng, đầu ra và cách đánh giá riêng. Nếu lùi lại và phân nhóm các mẫu này, chúng có thể được chia thành 17 kiến trúc cấp cao thể hiện những hình dạng chính mà các hệ thống agent có thể có…
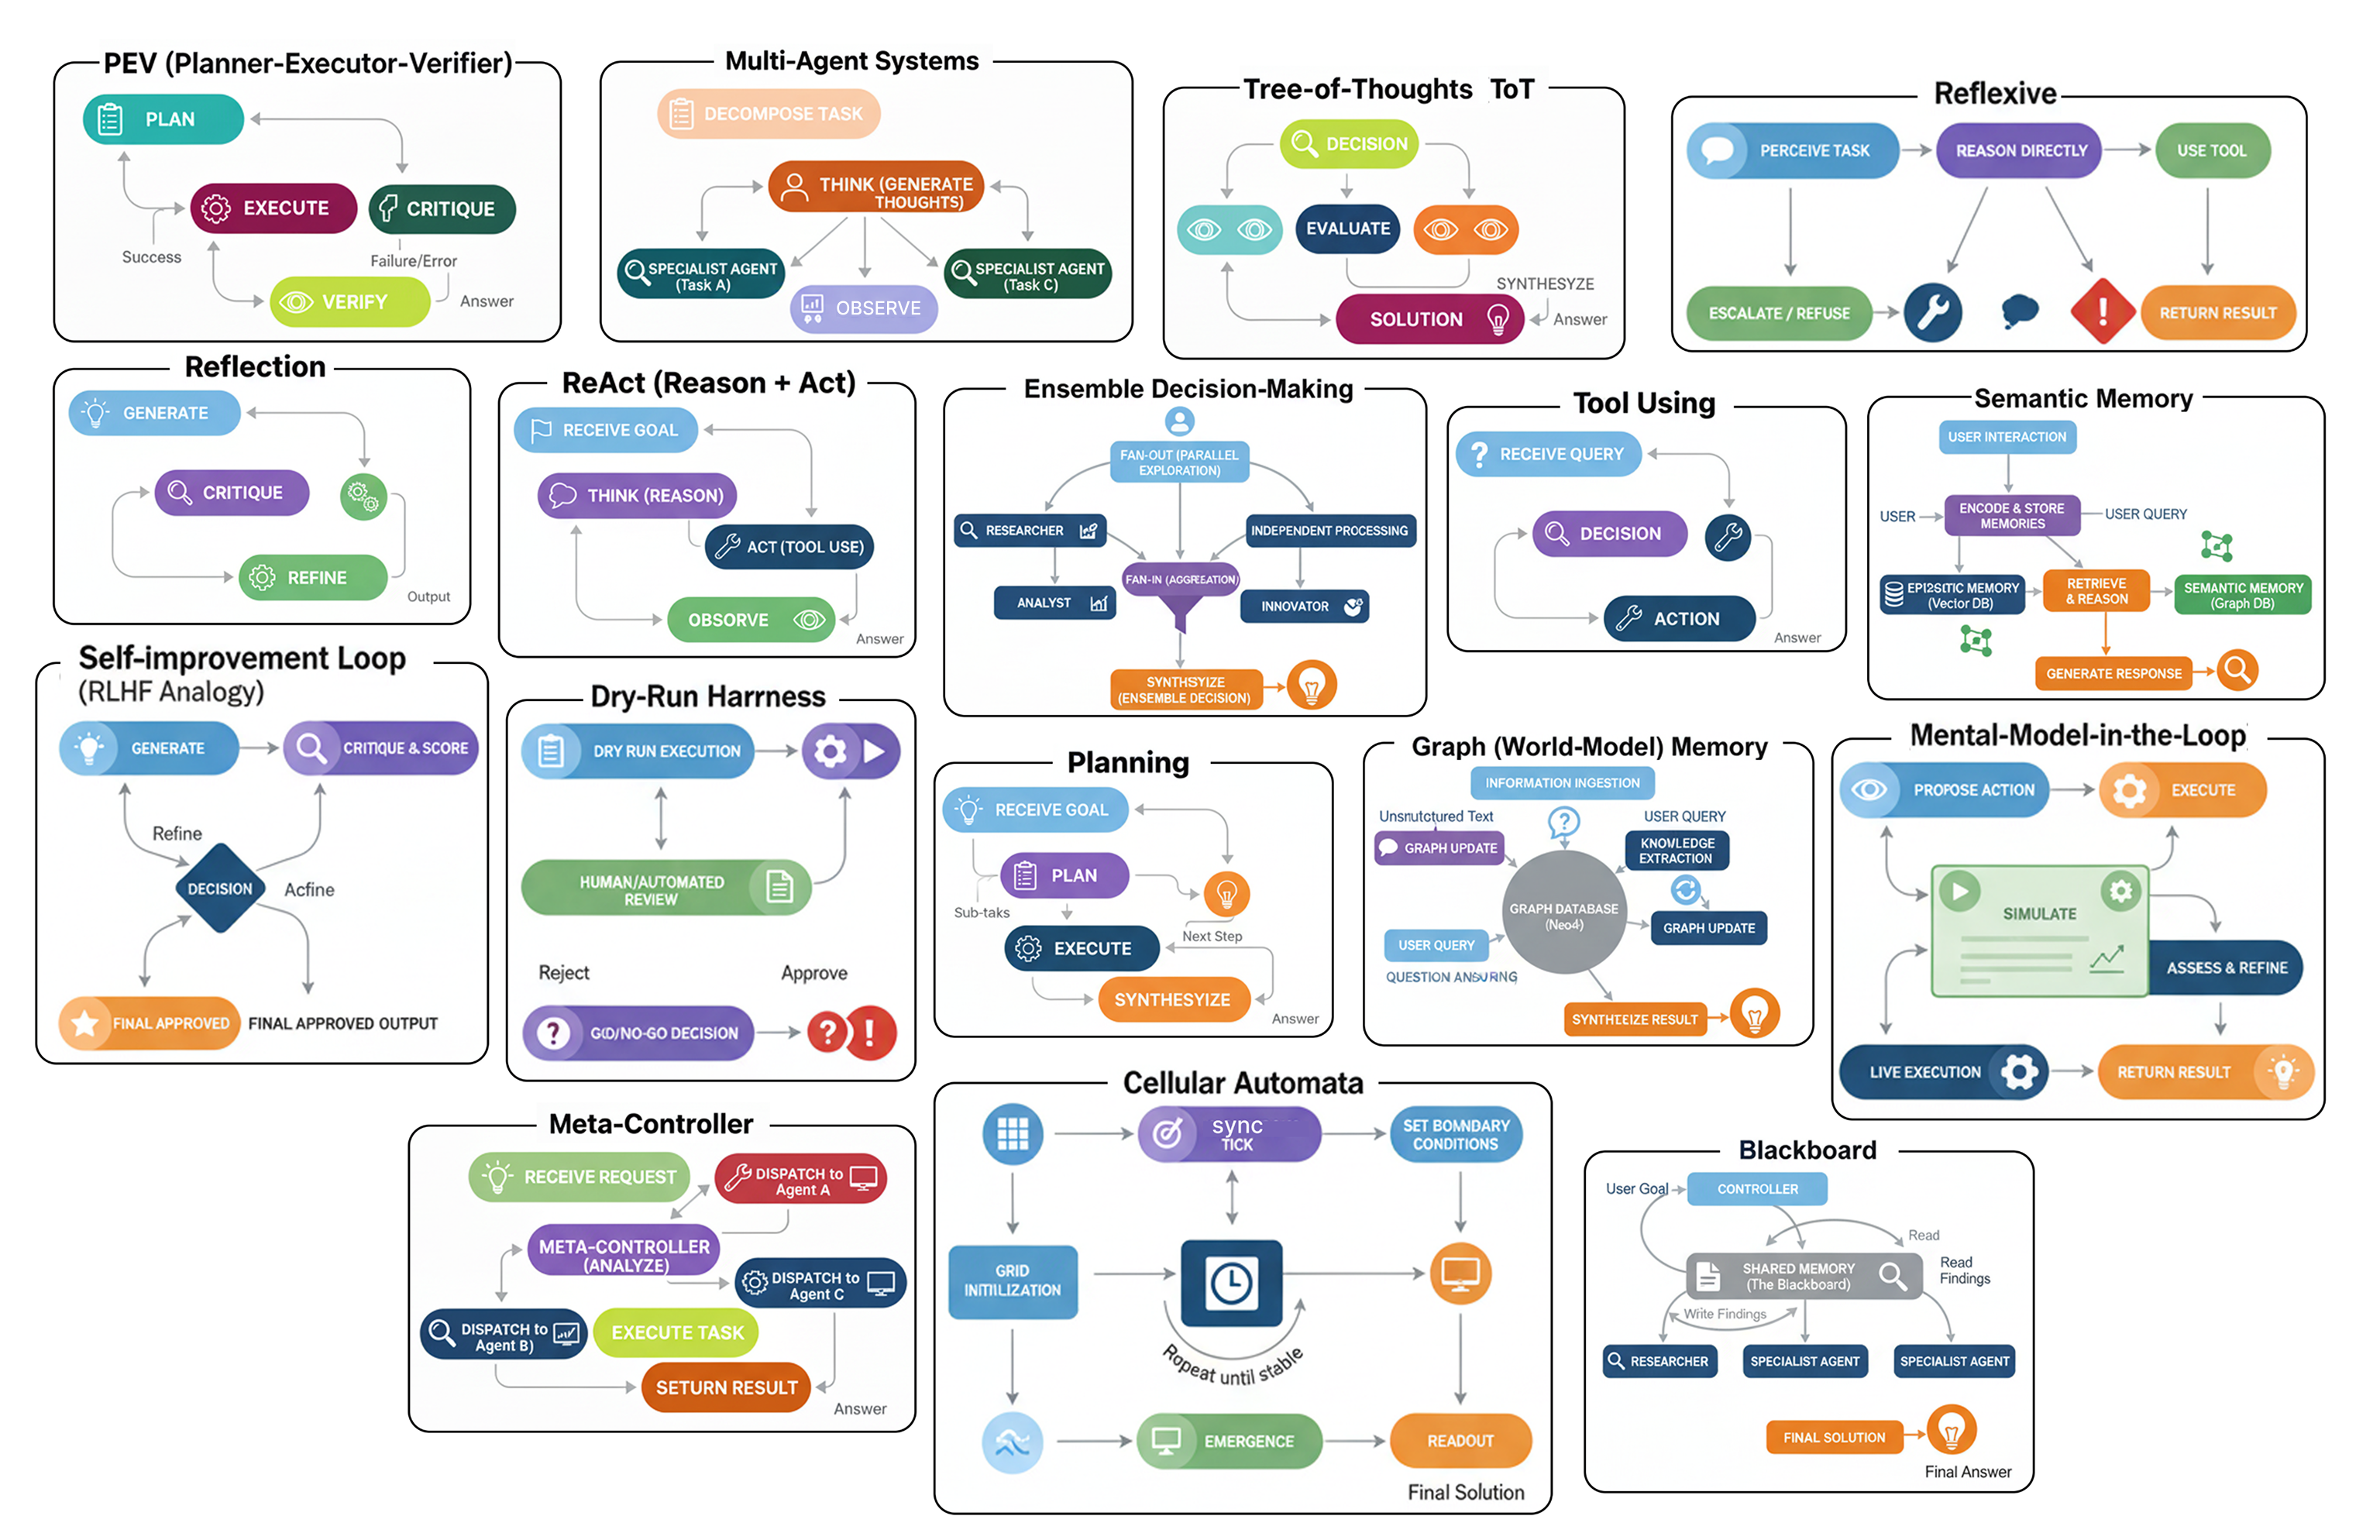 Các kiến trúc Agent (Tạo bởi Fareed Khan)
Một số mẫu bao gồm:
- Một Hệ thống đa agent (Multi-Agent System), nơi nhiều công cụ và agent làm việc cùng nhau để giải quyết một vấn đề.
- Một Hệ thống quyết định theo tập thể (Ensemble Decision System), nơi nhiều agent cùng đề xuất một câu trả lời và sau đó bỏ phiếu cho câu trả lời tốt nhất.
- Một Cây tư duy (Tree-of-Thoughts), nơi agent khám phá nhiều con đường lý luận khác nhau trước khi chọn hướng đi hứa hẹn nhất.
- Phương pháp phản tư (Reflexive approach), nơi agent có khả năng nhận ra và thừa nhận những gì nó không biết.
- Vòng lặp ReAct, nơi agent xen kẽ giữa việc suy nghĩ, hành động, và sau đó suy nghĩ lại để tinh chỉnh quy trình của mình.
Và còn nhiều mẫu khác nữa…
Trong blog này, chúng ta sẽ phân tích các loại kiến trúc agent khác nhau này và chỉ ra cách mỗi loại đóng một vai trò độc nhất trong một hệ thống AI hoàn chỉnh.
Chúng ta sẽ hiểu một cách trực quan tầm quan trọng của mỗi kiến trúc, lập trình quy trình làm việc của nó, và đánh giá để xem liệu nó có thực sự cải thiện hiệu suất so với một hệ thống cơ bản hay không.
Toàn bộ mã nguồn có sẵn trong kho GitHub của tôi:
GitHub - FareedKhan-dev/all-agentic-architectures: Implementation of 17+ agentic architectures…
Implementation of 17+ agentic architectures designed for practical use across different stages of AI system…
github.com
Cấu trúc mã nguồn được tổ chức như sau:
all-agentic-architectures/
    ├── 01_reflection.ipynb
    ├── 02_tool_use.ipynb
    ├── 03_ReAct.ipynb
    ...
    ├── 06_PEV.ipynb
    ├── 07_blackboard.ipynb
    ├── 08_episodic_with_semantic.ipynb
    ├── 09_tree_of_thoughts.ipynb
    ...
    ├── 14_dry_run.ipynb
    ├── 15_RLHF.ipynb
    ├── 16_cellular_automata.ipynb
    └── 17_reflexive_metacognitive.ipynb
Thiết lập môi trường
Trước khi bắt đầu xây dựng từng kiến trúc, chúng ta cần thiết lập những điều cơ bản và làm rõ những gì chúng ta đang sử dụng và tại sao: các module, các mô hình, và cách tất cả chúng khớp với nhau.
Chúng ta biết rằng LangChain, LangGraph, và LangSmith gần như là các module tiêu chuẩn ngành để xây dựng bất kỳ hệ thống RAG hay agent nghiêm túc nào. Chúng cung cấp mọi thứ chúng ta cần để xây dựng, điều phối, và quan trọng nhất là tìm hiểu những gì đang diễn ra bên trong các agent của chúng ta khi mọi thứ trở nên phức tạp, đó là lý do tại sao chúng ta gắn bó với ba công cụ này.
Bước đầu tiên là import các thư viện cốt lõi. Bằng cách này, chúng ta tránh lặp lại bản thân sau này và giữ cho việc thiết lập gọn gàng và sạch sẽ. Hãy làm điều đó.
import os
from typing import List, Dict, Any, Optional, Annotated, TypedDict
from dotenv import load_dotenv  # Load environment variables from .env file

# Pydantic for data modeling / validation
from pydantic import BaseModel, Field

# LangChain & LangGraph components
from langchain_nebius import ChatNebius  # Nebius LLM wrapper
from langchain_tavily import TavilySearch  # Tavily search tool integration
from langchain_core.prompts import ChatPromptTemplate  # For structuring prompts
from langgraph.graph import StateGraph, END  # Build a state machine graph
from langgraph.prebuilt import ToolNode, tools_condition  # Prebuilt nodes & conditions

# For pretty printing output
from rich.console import Console  # Console styling
from rich.markdown import Markdown  # Render markdown in terminal
Vậy, hãy nhanh chóng phân tích lý do tại sao chúng ta sử dụng ba công cụ này.
- LangChain là hộp công cụ của chúng ta, cung cấp các khối xây dựng cốt lõi như prompt, định nghĩa công cụ và trình bao bọc LLM.
- LangGraph là công cụ điều phối của chúng ta, kết nối mọi thứ lại với nhau thành các quy trình phức tạp với các vòng lặp và nhánh.
- LangSmith là trình gỡ lỗi của chúng ta, hiển thị một dấu vết trực quan của mỗi bước mà một agent thực hiện để chúng ta có thể nhanh chóng phát hiện và khắc phục sự cố.
Chúng ta sẽ làm việc với các LLM mã nguồn mở thông qua các nhà cung cấp như Nebius AI hoặc Together AI. Điểm hay là chúng hoạt động giống như module OpenAI tiêu chuẩn, vì vậy chúng ta không cần thay đổi nhiều để bắt đầu. Và nếu chúng ta muốn chạy mọi thứ cục bộ, chúng ta chỉ cần thay thế bằng một cái gì đó như Ollama.
Để đảm bảo các agent của chúng ta không bị mắc kẹt với dữ liệu tĩnh, chúng ta đang cấp cho chúng quyền truy cập vào Tavily API để tìm kiếm web trực tiếp (1000 tín dụng/tháng tôi nghĩ là đủ để thử nghiệm). Bằng cách đó, chúng có thể…
chủ động đi ra ngoài và tự tìm kiếm thông tin, điều này giữ cho sự tập trung vào việc lý luận và sử dụng công cụ thực sự.
Tiếp theo, chúng ta cần thiết lập các biến môi trường. Đây là nơi chúng ta sẽ lưu giữ thông tin nhạy cảm, như các khóa API. Để làm điều này, hãy tạo một tệp có tên .env trong cùng thư mục và thả các khóa của bạn vào đó, ví dụ:
# API key for Nebius LLM (used with ChatNebius)
NEBIUS_API_KEY="your_nebius_api_key_here"

# API key for LangSmith (LangChain’s observability/telemetry platform)
LANGCHAIN_API_KEY="your_langsmith_api_key_here"

# API key for Tavily search tool (used with TavilySearch integration)
TAVILY_API_KEY="your_tavily_api_key_here"
Khi tệp .env được thiết lập, chúng ta có thể dễ dàng lấy các khóa đó vào mã của mình bằng cách sử dụng module dotenv mà chúng ta đã import trước đó.
load_dotenv()  # Load environment variables from .env file

# Enable LangSmith tracing for monitoring / debugging
os.environ["LANGCHAIN_TRACING_V2"] = "true"
os.environ["LANGCHAIN_PROJECT"] = "Implementing 17 Agentic Architectures"  # Project name for grouping traces

# Verify that all required API keys are available
for key in ["NEBIUS_API_KEY", "LANGCHAIN_API_KEY", "TAVILY_API_KEY"]:
    if not os.environ.get(key):  # If key not found in env vars
        print(f"{key} not found. Please create a .env file and set it.")
Bây giờ, khi thiết lập cơ bản của chúng ta đã sẵn sàng, chúng ta có thể bắt đầu xây dựng từng kiến trúc một để xem chúng hoạt động như thế nào và chúng có ý nghĩa nhất ở đâu trong một hệ thống AI quy mô lớn.
Phản tư (Reflection)
Vậy, kiến trúc đầu tiên chúng ta sẽ xem xét là Phản tư (Reflection). Đây có lẽ là mẫu phổ biến và nền tảng nhất bạn thấy trong các quy trình làm việc của agent.
Nó xoay quanh việc trao cho một agent khả năng lùi lại một bước, xem xét công việc của chính nó và làm cho nó tốt hơn.
Trong một hệ thống AI quy mô lớn, mẫu này hoàn toàn phù hợp ở bất kỳ giai đoạn nào mà chất lượng của đầu ra được tạo ra là cực kỳ quan trọng. Hãy nghĩ về các tác vụ như tạo mã phức tạp, viết báo cáo kỹ thuật chi tiết, bất cứ nơi nào một câu trả lời đơn giản, bản nháp đầu tiên là không đủ tốt và có thể dẫn đến các vấn đề trong thế giới thực.
Hãy cùng tìm hiểu quy trình diễn ra như thế nào.
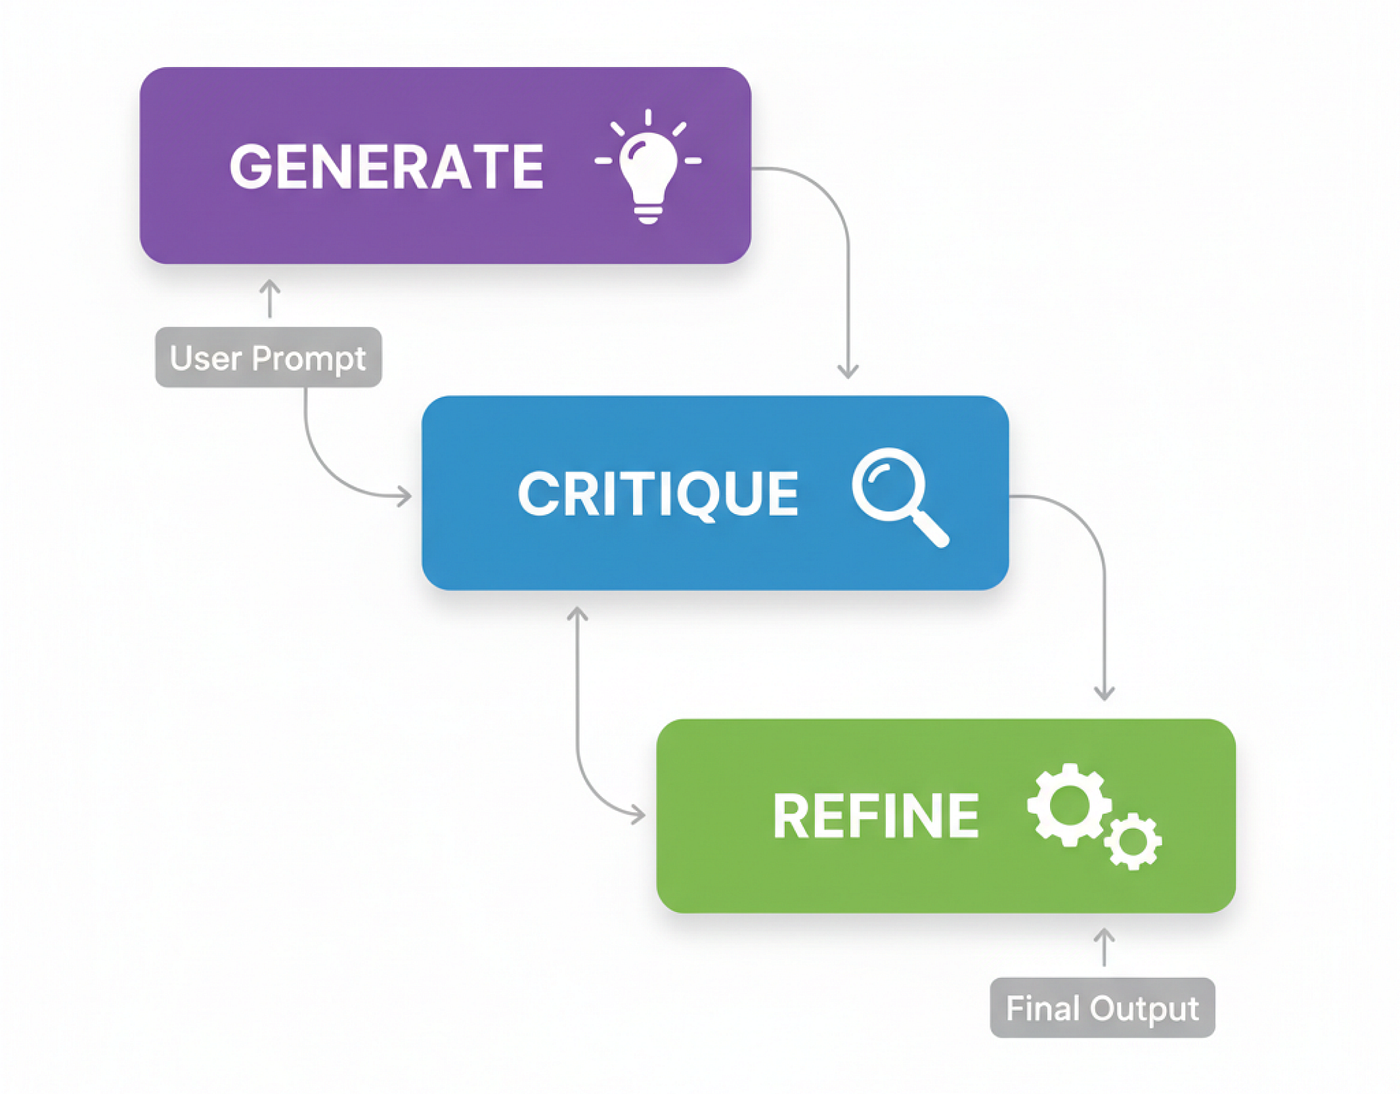 Quy trình làm việc của agent Phản tư (Tạo bởi Fareed Khan)
Trước khi tạo logic của agent, chúng ta cần định nghĩa các cấu trúc dữ liệu mà nó sẽ làm việc. Sử dụng các mô hình Pydantic là một cách tuyệt vời để buộc LLM cung cấp cho chúng ta đầu ra JSON sạch, có cấu trúc, điều này rất quan trọng cho một quy trình nhiều bước trong đó đầu ra của một bước trở thành đầu vào cho bước tiếp theo.
class DraftCode(BaseModel):
    """Schema for the initial code draft generated by the agent."""
    code: str = Field(description="The Python code generated to solve the user's request.")  # raw draft
    explanation: str = Field(description="A brief explanation of how the code works.")  # reasoning

class Critique(BaseModel):
    """Schema for the self-critique of the generated code."""
    has_errors: bool = Field(description="Does the code have any potential bugs or logical errors?")  # error check
    is_efficient: bool = Field(description="Is the code written in an efficient and optimal way?")  # performance check
    suggested_improvements: List[str] = Field(description="Specific, actionable suggestions for improving the code.")  # concrete fixes
    critique_summary: str = Field(description="A summary of the critique.")  # overview of review

class RefinedCode(BaseModel):
    """Schema for the final, refined code after incorporating the critique."""
    refined_code: str = Field(description="The final, improved Python code.")  # polished version
    refinement_summary: str = Field(description="A summary of the changes made based on the critique.")  # explanation of changes
Với các schema này, chúng ta có một 'hợp đồng' rõ ràng cho LLM của mình. Mô hình Critique đặc biệt hữu ích vì nó buộc phải có một bài đánh giá có cấu trúc, yêu cầu kiểm tra cụ thể về lỗi và hiệu quả thay vì chỉ là một lệnh mơ hồ "đánh giá mã".
Đầu tiên là generator_node của chúng ta. Công việc duy nhất của nó là nhận yêu cầu của người dùng và tạo ra bản nháp đầu tiên đó.
def generator_node(state):
    """Generates the initial draft of the code."""
    console.print("--- 1. Generating Initial Draft ---")
    # Initialize the LLM to return a structured DraftCode object
    generator_llm = llm.with_structured_output(DraftCode)

    prompt = f"""You are an expert Python programmer. Write a Python function to solve the following request.
    Provide a simple, clear implementation and an explanation.

    Request: {state['user_request']}
    """

    draft = generator_llm.invoke(prompt)
    return {"draft": draft.model_dump()}
Node này sẽ cung cấp cho chúng ta draft ban đầu và explanation của nó, sau đó chúng ta sẽ chuyển cho người phê bình để đánh giá.
Bây giờ đến phần cốt lõi của quy trình phản tư, critic_node. Đây là nơi agent đóng vai một nhà phát triển cấp cao và đưa ra một bài đánh giá mã nghiêm khắc cho chính công việc của mình.
def critic_node(state):
    """Critiques the generated code for errors and inefficiencies."""
    console.print("--- 2. Critiquing Draft ---")
    # Initialize the LLM to return a structured Critique object
    critic_llm = llm.with_structured_output(Critique)

    code_to_critique = state['draft']['code']

    prompt = f"""You are an expert code reviewer and senior Python developer. Your task is to perform a thorough critique of the following code.

    Analyze the code for:
    1.  **Bugs and Errors:** Are there any potential runtime errors, logical flaws, or edge cases that are not handled?
    2.  **Efficiency and Best Practices:** Is this the most efficient way to solve the problem? Does it follow standard Python conventions (PEP 8)?

    Provide a structured critique with specific, actionable suggestions.

    Code to Review:
    ```python
    {code_to_critique}
    ```
    """

    critique = critic_llm.invoke(prompt)
    return {"critique": critique.model_dump()}
Đầu ra ở đây là một đối tượng Critique có cấu trúc. Điều này tốt hơn nhiều so với một thông báo mơ hồ "cái này có thể được cải thiện" vì nó cung cấp cho bước tiếp theo của chúng ta những phản hồi cụ thể, có thể hành động để làm việc.
Phần cuối cùng của logic của chúng ta là refiner_node. Nó lấy bản nháp ban đầu và phản hồi của người chỉnh sửa và tạo ra phiên bản cuối cùng, được cải thiện.
def refiner_node(state):
    """Refines the code based on the critique."""
    console.print("--- 3. Refining Code ---")
    # Initialize the LLM to return a structured RefinedCode object
    refiner_llm = llm.with_structured_output(RefinedCode)

    draft_code = state['draft']['code']
    critique_suggestions = json.dumps(state['critique'], indent=2)

    prompt = f"""You are an expert Python programmer tasked with refining a piece of code based on a critique.

    Your goal is to rewrite the original code, implementing all the suggested improvements from the critique.

    **Original Code:**
    ```python
    {draft_code}
    ```

    **Critique and Suggestions:**
    {critique_suggestions}

    Please provide the final, refined code and a summary of the changes you made.
    """

    refined_code = refiner_llm.invoke(prompt)
    return {"refined_code": refined_code.model_dump()}
Được rồi, chúng ta có ba phần logic. Bây giờ, chúng ta cần kết nối chúng lại với nhau thành một quy trình làm việc. Đây là lúc LangGraph phát huy tác dụng. Chúng ta sẽ định nghĩa state được truyền giữa các node và sau đó xây dựng chính đồ thị đó.
class ReflectionState(TypedDict):
    """Represents the state of our reflection graph."""
    user_request: str
    draft: Optional[dict]
    critique: Optional[dict]
    refined_code: Optional[dict]

# Initialize a new state graph
graph_builder = StateGraph(ReflectionState)

# Add the nodes to the graph
graph_builder.add_node("generator", generator_node)
graph_builder.add_node("critic", critic_node)
graph_builder.add_node("refiner", refiner_node)

# Define the workflow edges as a simple linear sequence
graph_builder.set_entry_point("generator")
graph_builder.add_edge("generator", "critic")
graph_builder.add_edge("critic", "refiner")
graph_builder.add_edge("refiner", END)

# Compile the graph into a runnable application
reflection_app = graph_builder.compile()
Luồng đi là một đường thẳng đơn giản: generator -> critic -> refiner. Đây là mẫu Phản tư cổ điển, và bây giờ chúng ta đã sẵn sàng để kiểm tra nó.
 Agent Phản tư (Tạo bởi Fareed Khan)
Để kiểm tra quy trình này, chúng ta sẽ đưa ra một bài toán lập trình cổ điển mà lần thử đầu tiên ngây thơ thường không hiệu quả, tìm số Fibonacci thứ n. Đây là một trường hợp thử nghiệm hoàn hảo vì một giải pháp đệ quy đơn giản dễ viết nhưng tốn kém về mặt tính toán, để lại nhiều chỗ để cải thiện.
user_request = "Write a Python function to find the nth Fibonacci number."
initial_input = {"user_request": user_request}

console.print(f"[bold cyan]🚀 Kicking off Reflection workflow for request:[/bold cyan] '{user_request}'\n")

# Stream the results and capture the final state
final_state = None
for state_update in reflection_app.stream(initial_input, stream_mode="values"):
    final_state = state_update

console.print("\n[bold green]✅ Reflection workflow complete![/bold green]")
Hãy xem xét trước và sau để thấy agent của chúng ta đã làm gì.
--- ### Initial Draft ---
Explanation: This function uses a recursive approach to calculate the nth Fibonacci number... This approach is not efficient for large values of n due to the repeated calculations...

1 def fibonacci(n):
2     if n <= 0:
3         return 0
4     elif n == 1:
5         return 1
6     else:
7         return fibonacci(n-1) + fibonacci(n-2)

--- ### Critique ---
Summary: The function has potential bugs and inefficiencies. It should be revised to handle negative inputs and improve its time complexity.
Improvements Suggested:
- The function does not handle negative numbers correctly.
- The function has a high time complexity due to the repeated calculations. Consider using dynamic programming or memoization.
- The function does not follow PEP 8 conventions...

--- ### Final Refined Code ---
Refinement Summary: The original code has been revised to handle negative inputs, improve its time complexity, and follow PEP 8 conventions.

 1 def fibonacci(n):
 2     """Calculates the nth Fibonacci number."""
 3     if n < 0:
 4         raise ValueError("n must be a non-negative integer")
 5     elif n == 0:
 6         return 0
 7     elif n == 1:
 8         return 1
 9     else:
10         fib = [0, 1]
11         for i in range(2, n + 1):
12             fib.append(fib[i-1] + fib[i-2])
13         return fib[n]
Bản nháp ban đầu là một hàm đệ quy đơn giản, đúng nhưng cực kỳ không hiệu quả. Người phê bình chỉ ra độ phức tạp theo cấp số nhân và các vấn đề khác. Và mã được tinh chỉnh là một giải pháp lặp thông minh và mạnh mẽ hơn nhiều. Đây là một ví dụ hoàn hảo về mẫu hoạt động như dự định.
Để làm điều này cụ thể hơn, hãy đưa một LLM khác vào vai trò 'giám khảo' khách quan và chấm điểm cả bản nháp ban đầu và mã cuối cùng. Điều này sẽ cho chúng ta một thước đo định lượng về sự cải thiện.
class CodeEvaluation(BaseModel):
    """Schema for evaluating a piece of code."""
    correctness_score: int = Field(description="Score from 1-10 on whether the code is logically correct.")
    efficiency_score: int = Field(description="Score from 1-10 on the code's algorithmic efficiency.")
    style_score: int = Field(description="Score from 1-10 on code style and readability (PEP 8). ")
    justification: str = Field(description="A brief justification for the scores.")

def evaluate_code(code_to_evaluate: str):
    prompt = f"""You are an expert judge of Python code. Evaluate the following function on a scale of 1-10 for correctness, efficiency, and style. Provide a brief justification.

    Code:
    ```python
    {code_to_evaluate}
    ```
    """
    return judge_llm.invoke(prompt)

if final_state and 'draft' in final_state and 'refined_code' in final_state:
    console.print("--- Evaluating Initial Draft ---")
    initial_draft_evaluation = evaluate_code(final_state['draft']['code'])
    console.print(initial_draft_evaluation.model_dump()) # Corrected: use .model_dump()

    console.print("\n--- Evaluating Refined Code ---")
    refined_code_evaluation = evaluate_code(final_state['refined_code']['refined_code'])
    console.print(refined_code_evaluation.model_dump()) # Corrected: use .model_dump()
else:
    console.print("[bold red]Error: Cannot perform evaluation because the `final_state` is incomplete.[/bold red]")
Khi chúng ta chạy giám khảo trên cả hai phiên bản, điểm số đã nói lên tất cả.
--- Evaluating Initial Draft ---
{
    'correctness_score': 2,
    'efficiency_score': 4,
    'style_score': 2,
    'justification': 'The function has a time complexity of O(2^n)...'
}

--- Evaluating Refined Code ---
{
    'correctness_score': 8,
    'efficiency_score': 6,
    'style_score': 9,
    'justification': 'The code is correct... it has a time complexity of O(n)...'
}
Bản nháp ban đầu nhận điểm rất tệ, đặc biệt là về hiệu quả. Mã được tinh chỉnh thấy một sự nhảy vọt lớn trên tất cả các phương diện.
Điều này cho chúng ta bằng chứng chắc chắn rằng quy trình phản tư không chỉ thay đổi mã, nó đã làm cho nó tốt hơn phần nào.
Sử dụng công cụ (Tool Using)
Mẫu Phản tư mà chúng ta vừa xây dựng rất tuyệt vời để mài giũa lý luận nội tại của một agent.
Nhưng điều gì sẽ xảy ra khi agent cần thông tin mà nó chưa biết?
Nếu không có quyền truy cập vào các công cụ bên ngoài, một LLM bị giới hạn trong các tham số được huấn luyện trước của nó, nó có thể tạo ra và lý luận, nhưng không thể truy vấn dữ liệu mới hoặc tương tác với thế giới bên ngoài. Đó là nơi kiến trúc thứ hai của chúng ta, Sử dụng công cụ (Tool Use), phát huy tác dụng.
Trong bất kỳ hệ thống AI quy mô lớn nào, việc sử dụng công cụ không phải là tùy chọn mà là một thành phần quan trọng và cần thiết. Nó hoạt động như cầu nối giữa lý luận của một agent và dữ liệu thế giới thực. Cho dù đó là một bot hỗ trợ kiểm tra trạng thái đơn hàng, hay một agent tài chính lấy giá cổ phiếu trực tiếp.
Hãy cùng tìm hiểu quy trình diễn ra như thế nào.
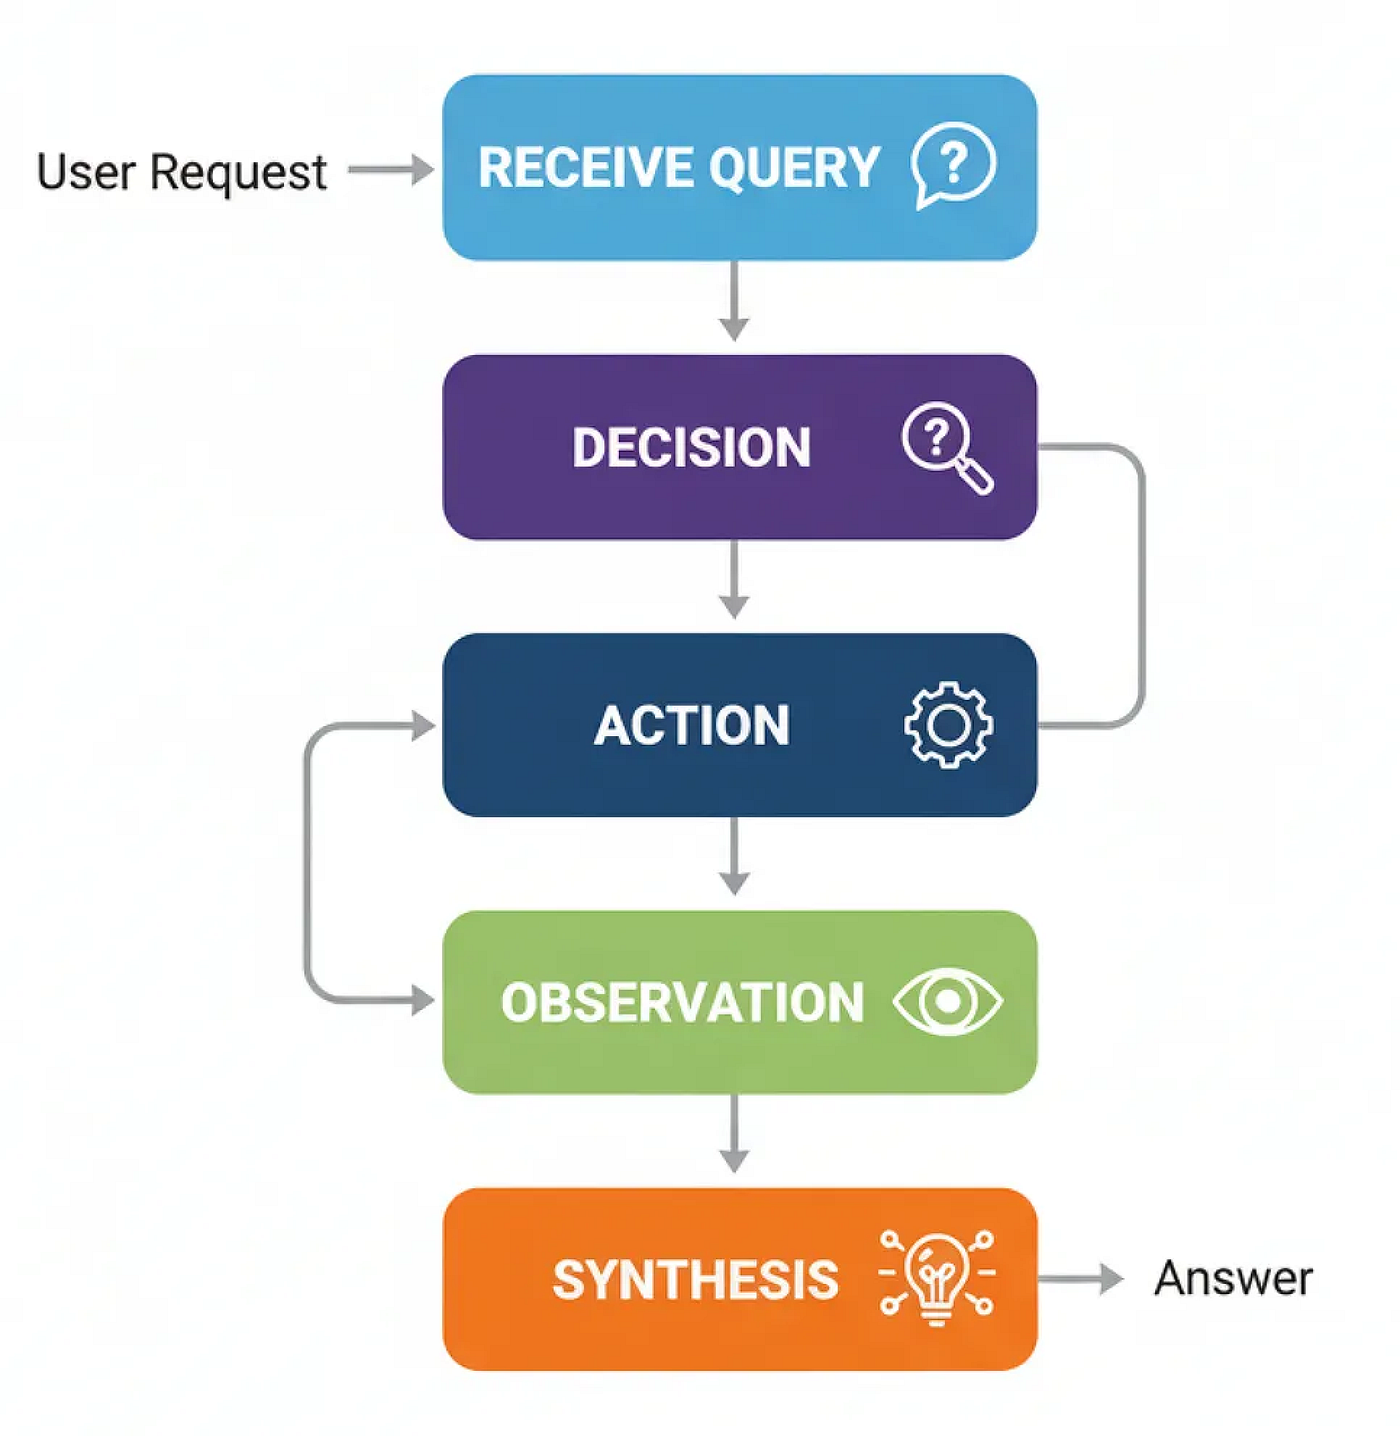 Quy trình làm việc sử dụng công cụ (Tạo bởi Fareed Khan)
Để xây dựng điều này, chúng ta cần cung cấp cho agent một công cụ. Đối với điều này, chúng ta sẽ sử dụng công cụ TavilySearchResults, cho phép agent của chúng ta truy cập để tìm kiếm trên web. Phần quan trọng nhất ở đây là mô tả. LLM đọc mô tả ngôn ngữ tự nhiên này để tìm ra công cụ làm gì và khi nào nên sử dụng nó, vì vậy việc làm cho nó rõ ràng và chính xác là chìa khóa.
# Initialize the tool. We can set the max number of results to keep the context concise.
search_tool = TavilySearchResults(max_results=2)

# It's crucial to give the tool a clear name and description for the agent
search_tool.name = "web_search"
search_tool.description = "A tool that can be used to search the internet for up-to-date information on any topic, including news, events, and current affairs."

tools = [search_tool]
Bây giờ chúng ta đã có một công cụ chức năng, chúng ta có thể xây dựng agent sẽ học cách sử dụng nó. Trạng thái cho một agent sử dụng công cụ khá đơn giản, nó chỉ là một danh sách các tin nhắn theo dõi toàn bộ lịch sử cuộc trò chuyện.
class AgentState(TypedDict):
    messages: Annotated[list[AnyMessage], add_messages]
Tiếp theo, chúng ta phải làm cho LLM “nhận biết” về các công cụ chúng ta đã cung cấp cho nó. Đây là một bước quan trọng. Chúng ta sử dụng phương thức .bind_tools(), về cơ bản là chèn tên và mô tả của công cụ vào system prompt của LLM, cho phép nó quyết định khi nào nên gọi công cụ.
llm = ChatNebius(model="meta-llama/Meta-Llama-3.1-8B-Instruct", temperature=0)

# Bind the tools to the LLM, making it tool-aware
llm_with_tools = llm.bind_tools(tools)
Bây giờ chúng ta có thể định nghĩa quy trình làm việc của agent bằng LangGraph. Chúng ta cần hai node chính: agent_node ("bộ não") gọi LLM để quyết định phải làm gì, và tool_node ("đôi tay") thực sự thực thi công cụ.
def agent_node(state: AgentState):
    """The primary node that calls the LLM to decide the next action."""
    console.print("--- AGENT: Thinking... ---")
    response = llm_with_tools.invoke(state["messages"])
    return {"messages": [response]}

# The ToolNode is a pre-built node from LangGraph that executes tools
tool_node = ToolNode(tools)
Sau khi agent_node chạy, chúng ta cần một bộ định tuyến để quyết định đi đâu tiếp theo. Nếu tin nhắn cuối cùng của agent chứa thuộc tính tool_calls, điều đó có nghĩa là nó muốn sử dụng một công cụ, vì vậy chúng ta định tuyến đến tool_node. Nếu không, điều đó có nghĩa là agent có câu trả lời cuối cùng, và chúng ta có thể kết thúc quy trình làm việc.
def router_function(state: AgentState) -> str:
    """Inspects the agent's last message to decide the next step."""
    last_message = state["messages"][-1]
    if last_message.tool_calls:
        # The agent has requested a tool call
        console.print("--- ROUTER: Decision is to call a tool. ---")
        return "call_tool"
    else:
        # The agent has provided a final answer
        console.print("--- ROUTER: Decision is to finish. ---")
        return "__end__"
Được rồi, chúng ta có tất cả các mảnh ghép. Hãy kết nối chúng lại với nhau thành một đồ thị. Chìa khóa ở đây là cạnh điều kiện sử dụng router_function của chúng ta để tạo ra vòng lặp lý luận chính của agent: agent -> router -> tool -> agent.
graph_builder = StateGraph(AgentState)

# Add the nodes
graph_builder.add_node("agent", agent_node)
graph_builder.add_node("call_tool", tool_node)

# Set the entry point
graph_builder.set_entry_point("agent")

# Add the conditional router
graph_builder.add_conditional_edges(
    "agent",
    router_function,
)

# Add the edge from the tool node back to the agent to complete the loop
graph_builder.add_edge("call_tool", "agent")

# Compile the graph
tool_agent_app = graph_builder.compile()
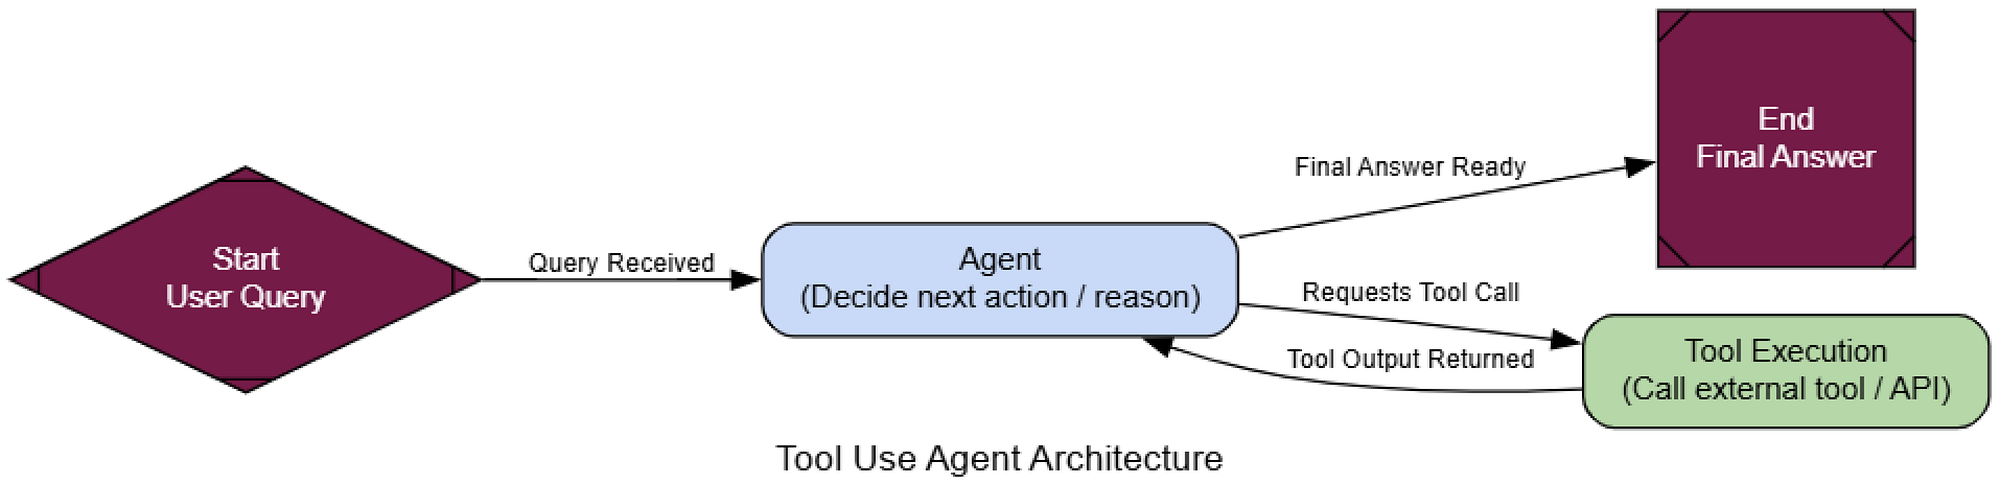 Kiến trúc gọi công cụ (Tạo bởi Fareed Khan)
Bây giờ hãy kiểm tra nó. Chúng ta sẽ đưa ra một câu hỏi mà nó không thể biết từ dữ liệu huấn luyện của mình, buộc nó phải sử dụng công cụ tìm kiếm web để tìm câu trả lời thời gian thực.
user_query = "What were the main announcements from Apple's latest WWDC event?"
initial_input = {"messages": [("user", user_query)]}

console.print(f"[bold cyan]🚀 Kicking off Tool Use workflow for request:[/bold cyan] '{user_query}'\n")

for chunk in tool_agent_app.stream(initial_input, stream_mode="values"):
    chunk["messages"][-1].pretty_print()
    console.print("\n---\n")

console.print("\n[bold green]✅ Tool Use workflow complete![/bold green]")
Hãy xem đầu ra để thấy quá trình suy nghĩ của agent.
================================= Human Message =================================
What were the main announcements from Apple's latest WWDC event?
---
--- AGENT: Thinking... ---
--- ROUTER: Decision is to call a tool. ---
================================== Ai Message ==================================
Tool Calls:
  web_search (call_abc123)
  Args:
    query: Apple WWDC latest announcements
---
================================= Tool Message =================================
Name: web_search
[{"title": "WWDC 2025: Everything We Know...", "url": "...", "content": "Apple's event lasted for an hour... we recapped all of the announcements... iOS 26, iPadOS 26, macOS Tahoe..."}]
---
--- AGENT: Thinking... ---
--- ROUTER: Decision is to finish. ---
================================== Ai Message ==================================
The main announcements from Apple's latest WWDC event include a new design that will inform the next decade of iOS, iPadOS, and macOS development, new features for the iPhone... and updates across every platform, including iOS 26, iPadOS 26, CarPlay, macOS Tahoe...
Dấu vết rõ ràng cho thấy logic của agent.
Để chính thức hóa điều này, chúng ta sẽ lại sử dụng LLM-làm-Giám-khảo, nhưng với các tiêu chí dành riêng cho việc đánh giá việc sử dụng công cụ.
class ToolUseEvaluation(BaseModel):
    """Schema for evaluating the agent's tool use and final answer."""
    tool_selection_score: int = Field(description="Score 1-5 on whether the agent chose the correct tool for the task.")
    tool_input_score: int = Field(description="Score 1-5 on how well-formed and relevant the input to the tool was.")
    synthesis_quality_score: int = Field(description="Score 1-5 on how well the agent integrated the tool's output into its final answer.")
    justification: str = Field(description="A brief justification for the scores.")
Khi chúng ta chạy giám khảo trên toàn bộ dấu vết cuộc trò chuyện, chúng ta nhận lại một đánh giá có cấu trúc.
--- Evaluating Tool Use Performance ---
{
    'tool_selection_score': 5,
    'tool_input_score': 5,
    'synthesis_quality_score': 4,
    'justification': "The AI agent correctly used the web search tool to find relevant information... The tool output was well-formed and relevant... the AI agent could have done a better job of synthesizing the information..."
}
Điểm số cao cho chúng ta bằng chứng rằng agent của chúng ta không chỉ gọi công cụ, mà còn thực sự sử dụng nó một cách hiệu quả.
Nó đã xác định chính xác khi nào cần tìm kiếm, tìm kiếm cái gì, và cách sử dụng kết quả. Kiến trúc này là một khối xây dựng cơ bản cho hầu hết mọi trợ lý AI thực tế.
ReAct (Lý luận + Hành động)
Agent cuối cùng của chúng ta là một bước tiến lớn. Nó có thể sử dụng các công cụ để lấy dữ liệu trực tiếp, điều này rất tuyệt. Vấn đề là, nó hơi giống một cú ăn ngay, nó quyết định cần một công cụ, gọi nó một lần, và sau đó cố gắng trả lời.
Nhưng điều gì sẽ xảy ra khi một vấn đề phức tạp hơn và cần nhiều bước phụ thuộc để giải quyết?
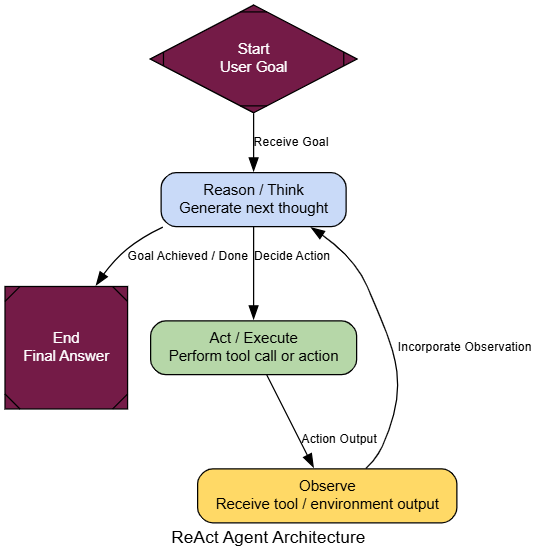
ReAct (Reason + Act) là tất cả về việc tạo ra một vòng lặp. Nó cho phép một agent lý luận một cách linh hoạt về việc phải làm gì tiếp theo, thực hiện một hành động (như gọi một công cụ), quan sát kết quả, và sau đó sử dụng thông tin mới đó để lý luận lại. Đó là một bước chuyển từ một người gọi công cụ tĩnh sang một người giải quyết vấn đề thích ứng.
Trong bất kỳ hệ thống AI nào, ReAct là mẫu bạn nên dùng cho bất kỳ tác vụ nào đòi hỏi lý luận đa bước (multi-hop).
Hãy cùng tìm hiểu quy trình diễn ra như thế nào.
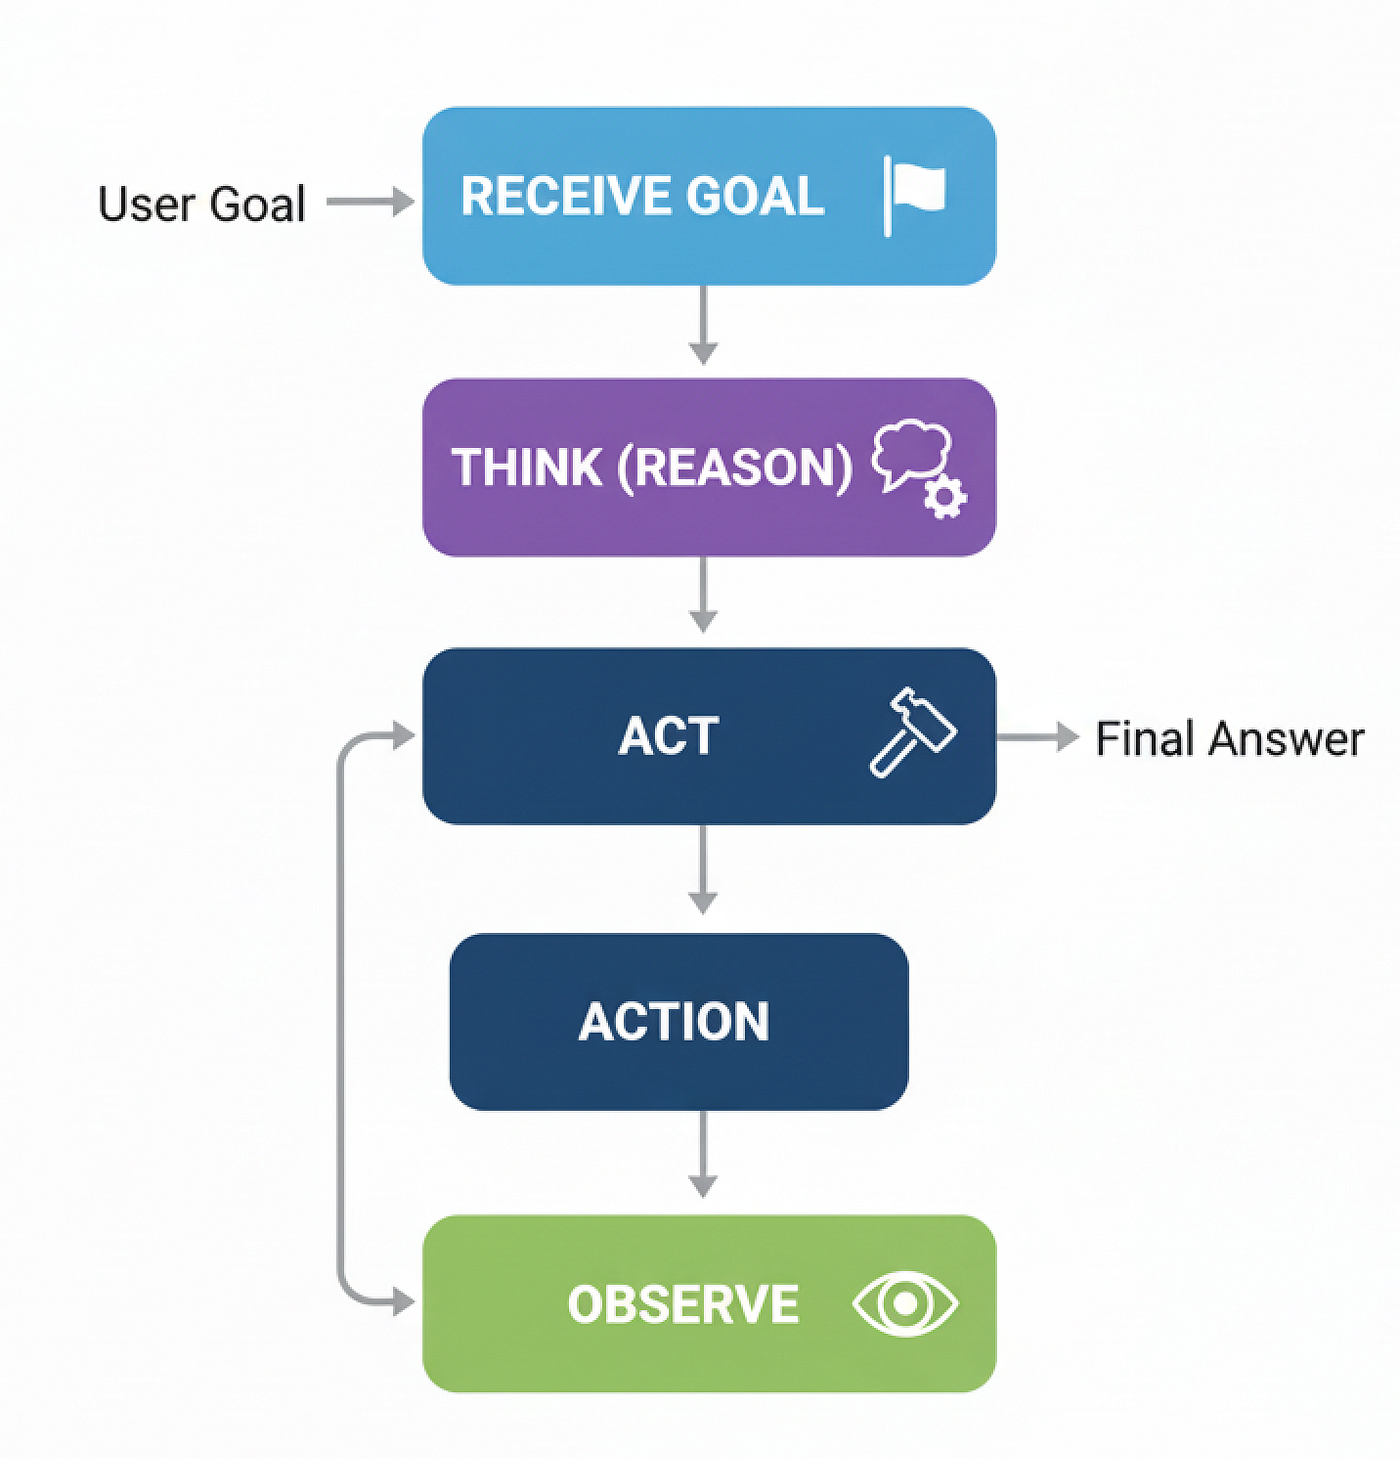 Quy trình làm việc ReAct (Tạo bởi Fareed Khan)
Tin tốt là, chúng ta đã xây dựng hầu hết các mảnh ghép. Chúng ta sẽ tái sử dụng AgentState, web_search, và tool_node. Thay đổi duy nhất trong logic đồ thị của chúng ta: sau khi tool_node chạy, chúng ta gửi đầu ra trở lại agent_node thay vì kết thúc. Điều này tạo ra vòng lặp lý luận, cho phép agent xem xét kết quả và chọn bước tiếp theo.
def react_agent_node(state: AgentState):
    """The agent node that thinks and decides the next step."""
    console.print("--- REACT AGENT: Thinking... ---")
    response = llm_with_tools.invoke(state["messages"])
    return {"messages": [response]}

# The ReAct graph with its characteristic loop
react_graph_builder = StateGraph(AgentState)
react_graph_builder.add_node("agent", react_agent_node)
react_graph_builder.add_node("tools", tool_node) # We reuse the tool_node from before

react_graph_builder.set_entry_point("agent")
react_graph_builder.add_conditional_edges(
    "agent",
    # We can reuse the same router function
    router_function,
    # The map now defines the routing logic
    {"call_tool": "tools", "__end__": "__end__"}
)

# This is the key difference: the edge goes from the tool node BACK to the agent
react_graph_builder.add_edge("tools", "agent")

react_agent_app = react_graph_builder.compile()
 Kiến trúc ReAct (Tạo bởi Fareed Khan)
Và đó là tất cả. Thay đổi thực sự duy nhất là react_graph_builder.add_edge("tools", "agent"). Dòng duy nhất đó tạo ra vòng lặp và biến người dùng công cụ đơn giản của chúng ta thành một agent ReAct năng động.
Để thấy tại sao vòng lặp này lại mạnh mẽ đến vậy, hãy giao cho nó một nhiệm vụ không thể giải quyết trong một lần - một câu hỏi đa bước cổ điển. Một agent sử dụng công cụ đơn giản sẽ thất bại ở đây vì nó không thể xâu chuỗi các bước lại với nhau.
multi_step_query = "Who is the current CEO of the company that created the sci-fi movie 'Dune', and what was the budget for that company's most recent film?"

console.print(f"[bold yellow]Testing ReAct agent on a multi-step query:[/bold yellow] '{multi_step_query}'\n")

final_react_output = None
# Stream the output to see the step-by-step reasoning
for chunk in react_agent_app.stream({"messages": [("user", multi_step_query)]}, stream_mode="values"):
    final_react_output = chunk
    console.print(f"--- [bold purple]Current State Update[/bold purple] ---")
    chunk['messages'][-1].pretty_print()
    console.print("\n")

console.print("\n--- [bold green]Final Output from ReAct Agent[/bold green] ---")
console.print(Markdown(final_react_output['messages'][-1].content))
--- Human Message ---
Who is CEO of company that made 'Dune'...

--- REACT Agent: Thinking... ---
--- ROUTER: Call a tool...

--- Ai Message ---
Tool Calls: web_search...
Args: query: current CEO of company that made Dune...

--- Tool Message ---
[{"title": "Dune: Part Three - Wikipedia", "content": "Legendary CEO Joshua Grode..."}]

--- REACT Agent: Thinking... ---
--- ROUTER: Finish...

--- Final Output ---
CEO of company that made 'Dune' is Joshua Grode...
Budget for most recent film not found...
Khi chúng ta chạy điều này, dấu vết thực thi của agent cho thấy một quy trình thông minh hơn nhiều. Nó không chỉ thực hiện một tìm kiếm. Thay vào đó, nó lý luận theo cách của mình để giải quyết vấn đề.
Để chính thức hóa sự cải thiện, chúng ta có thể sử dụng lại LLM-làm-Giám-khảo, lần này tập trung vào việc hoàn thành nhiệm vụ.
class TaskEvaluation(BaseModel):
    """Schema for evaluating an agent's ability to complete a task."""
    task_completion_score: int = Field(description="Score 1-10 on whether the agent successfully completed all parts of the user's request.")
    reasoning_quality_score: int = Field(description="Score 1-10 on the logical flow and reasoning process demonstrated by the agent.")
    justification: str = Field(description="A brief justification for the scores.")

def evaluate_agent_output(query: str, agent_output: dict):
    """Runs an LLM-as-a-Judge to evaluate the agent's final performance."""
    trace = "\n".join([f"{m.type}: {m.content}" for m in agent_output['messages']])

    prompt = f"""You are an expert judge of AI agents. Evaluate the following agent's performance on the given task on a scale of 1-10. A score of 10 means the task was completed perfectly. A score of 1 means complete failure.

    **User's Task:**
    {query}

    **Full Agent Conversation Trace:**
    ```
    {trace}
    ```
    """

    judge_llm = llm.with_structured_output(TaskEvaluation)
    return judge_llm.invoke(prompt)
Hãy xem điểm số. Một agent cơ bản thử nhiệm vụ này sẽ nhận được điểm rất thấp, vì nó sẽ không thể thu thập tất cả thông tin cần thiết. Tuy nhiên, agent ReAct của chúng ta hoạt động tốt hơn nhiều.
--- Evaluating ReAct Agent's Output ---
{
    'task_completion_score': 8,
    'reasoning_quality_score': 9,
    'justification': "The agent correctly broke down the problem into multiple steps... It successfully identified the company, then the CEO. While it struggled to find the budget for the most recent film, its reasoning process was sound and it completed most of the task."
}
Chúng ta có thể thấy rằng reasoning_quality_score xác nhận rằng quy trình từng bước của nó là hợp lý và được xác thực bởi giám khảo của chúng ta (LLM).
Mẫu ReAct cung cấp cho agent khả năng giải quyết các loại vấn đề phức tạp, đa bước đòi hỏi tư duy năng động.
Lập kế hoạch (Planning)
Mẫu ReAct rất tuyệt vời để khám phá một vấn đề và tìm ra mọi thứ một cách linh hoạt. Nhưng nó có thể hơi kém hiệu quả đối với các tác vụ mà các bước có thể dự đoán được. Nó giống như một người hỏi đường từng ngã rẽ một, thay vì chỉ nhìn vào toàn bộ bản đồ trước. Đây là nơi kiến trúc Lập kế hoạch (Planning) phát huy tác dụng.
Mẫu này giới thiệu một lớp dự đoán quan trọng.
Thay vì phản ứng từng bước, một agent lập kế hoạch trước tiên tạo ra một 'kế hoạch tác chiến' đầy đủ trước khi thực hiện bất kỳ hành động nào.
Trong hệ thống AI, Lập kế hoạch là con ngựa thồ của bạn cho bất kỳ quy trình đa bước, có cấu trúc nào. Hãy nghĩ về các đường ống xử lý dữ liệu, tạo báo cáo, hoặc bất kỳ quy trình làm việc nào mà bạn biết trước trình tự các hoạt động. Nó mang lại khả năng dự đoán và hiệu quả, làm cho hành vi của agent dễ theo dõi và gỡ lỗi hơn.
Hãy cùng tìm hiểu quy trình diễn ra như thế nào.
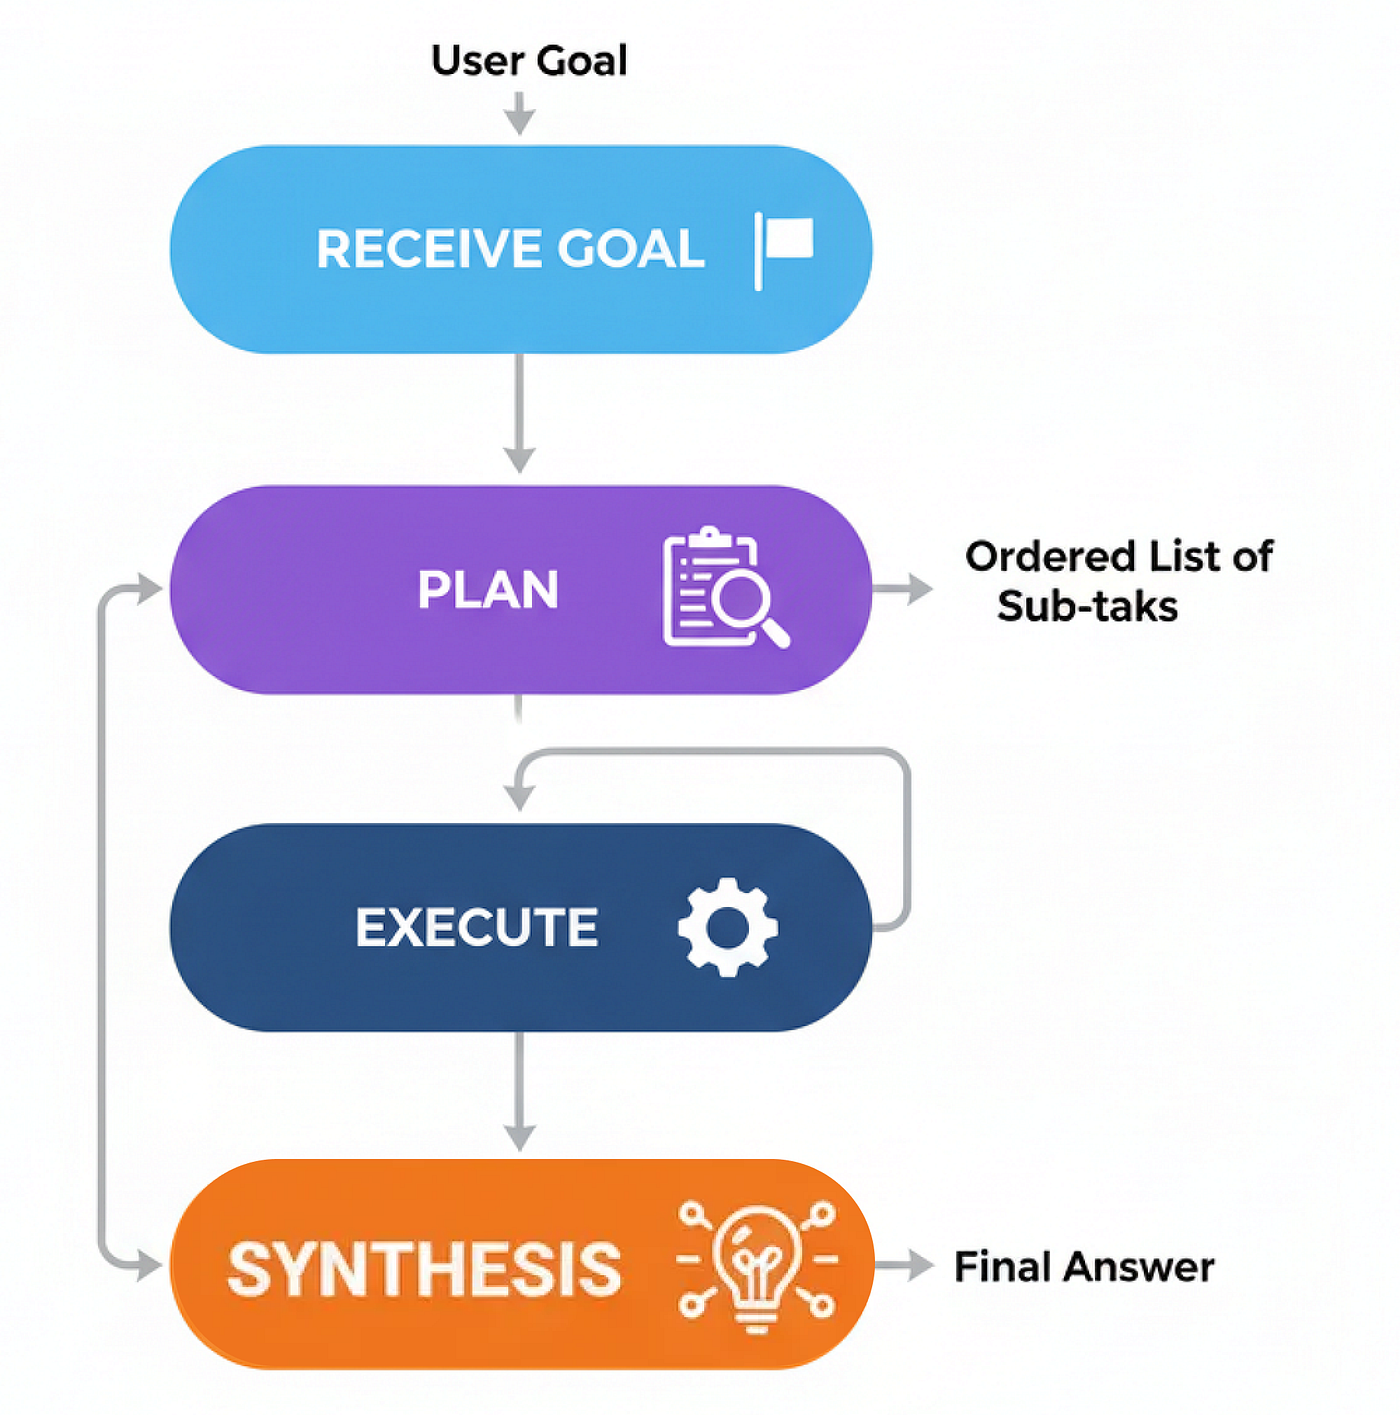 Phương pháp lập kế hoạch (Tạo bởi Fareed Khan)
Hãy bắt đầu xây dựng nó.
Chúng ta sẽ tạo ra ba thành phần cốt lõi: một planner_node để tạo chiến lược, một executor_node để thực hiện nó, và một synthesizer_node để tổng hợp báo cáo cuối cùng.
Đầu tiên, chúng ta cần một planner_node chuyên dụng. Chìa khóa ở đây là một prompt rất rõ ràng cho LLM biết công việc của nó là tạo ra một danh sách các bước đơn giản, có thể thực thi.
class Plan(BaseModel):
    """A plan of tool calls to execute to answer the user's query."""
    steps: List[str] = Field(description="A list of tool calls that, when executed, will answer the query.")

class PlanningState(TypedDict):
    user_request: str
    plan: Optional[List[str]]
    intermediate_steps: List[str] # Will store tool outputs
    final_answer: Optional[str]
def planner_node(state: PlanningState):
    """Generates a plan of action to answer the user's request."""
    console.print("--- PLANNER: Decomposing task... ---")
    planner_llm = llm.with_structured_output(Plan)

    prompt = f"""You are an expert planner. Your job is to create a step-by-step plan to answer the user's request.
        Each step in the plan must be a single call to the `web_search` tool.
        **User's Request:**
        {state['user_request']}
    """
    plan_result = planner_llm.invoke(prompt)
    console.print(f"--- PLANNER: Generated Plan: {plan_result.steps} ---")
    return {"plan": plan_result.steps}
Tiếp theo, executor_node. Đây là một công nhân đơn giản chỉ lấy bước tiếp theo từ kế hoạch, chạy công cụ, và thêm kết quả vào trạng thái của chúng ta.
def executor_node(state: PlanningState):
    """Executes the next step in the plan."""
    console.print("--- EXECUTOR: Running next step... ---")
    next_step = state["plan"][0]

    # In a real app, you'd parse the tool name and args. Here we assume 'web_search'.
    query = next_step.replace("web_search('", "").replace("')", "")

result = search_tool.invoke({"query": query})

    return {
        "plan": state["plan"][1:], # Pop the executed step
        "intermediate_steps": state["intermediate_steps"] + [result]
    }
Bây giờ chúng ta chỉ cần kết nối chúng lại với nhau trong một đồ thị. Một bộ định tuyến sẽ kiểm tra xem có còn bước nào trong kế hoạch không. Nếu có, nó sẽ lặp lại đến người thực thi. Nếu không, nó sẽ chuyển sang một synthesizer_node cuối cùng (mà chúng ta có thể tái sử dụng từ một mẫu trước đó) để tạo câu trả lời.
def planning_router(state: PlanningState):
    """Routes to the executor or synthesizer based on the plan."""
    if not state["plan"]:
        console.print("--- ROUTER: Plan complete. Moving to synthesizer. ---")
        return "synthesize"
    else:
        console.print("--- ROUTER: Plan has more steps. Continuing execution. ---")
        return "execute"


planning_graph_builder = StateGraph(PlanningState)
planning_graph_builder.add_node("plan", planner_node)
planning_graph_builder.add_node("execute", executor_node)

planning_graph_builder.add_node("synthesize", synthesizer_node)
planning_graph_builder.set_entry_point("plan")
planning_graph_builder.add_conditional_edges("plan", planning_router)
planning_graph_builder.add_conditional_edges("execute", planning_router)

planning_graph_builder.add_edge("synthesize", END)

planning_agent_app = planning_graph_builder.compile()
 Lập kế hoạch (tạo bởi Fareed Khan)
Để thực sự thấy sự khác biệt, hãy giao cho agent của chúng ta một nhiệm vụ được hưởng lợi từ việc có tầm nhìn xa. Một agent ReAct có thể giải quyết vấn đề này, nhưng quy trình từng bước của nó kém trực tiếp hơn.
plan_centric_query = """
Find the population of the capital cities of France, Germany, and Italy.
Then calculate their combined total.
"""

console.print(f"[bold green]Testing PLANNING agent on a plan-centric query:[/bold green] '{plan_centric_query}'\n")

# Initialize the state correctly, especially the list for intermediate steps
initial_planning_input = {"user_request": plan_centric_query, "intermediate_steps": []}
final_planning_output = planning_agent_app.invoke(initial_planning_input)

console.print("\n--- [bold green]Final Output from Planning Agent[/bold green] ---")
console.print(Markdown(final_planning_output['final_answer']))
Sự khác biệt trong quy trình ngay lập tức rõ ràng. Điều đầu tiên agent của chúng ta làm là vạch ra toàn bộ chiến lược của mình.
--- PLANNER: Decomposing task... ---
--- PLANNER: Generated Plan: ["web_search('population of Paris')", "web_search('population of Berlin')", "web_search('population of Rome')"] ---
--- ROUTER: Plan has more steps. Continuing execution. ---
--- EXECUTOR: Running next step... ---
...
Agent đã tạo ra một kế hoạch hoàn chỉnh, rõ ràng trước khi thực hiện một hành động duy nhất. Sau đó, nó thực hiện kế hoạch này một cách có phương pháp. Quy trình này minh bạch và mạnh mẽ hơn vì nó tuân theo một bộ hướng dẫn rõ ràng.
Để chính thức hóa điều này, chúng ta sẽ sử dụng LLM-làm-Giám-khảo, nhưng lần này chúng ta sẽ chấm điểm hiệu quả của quy trình.
class ProcessEvaluation(BaseModel):
    """Schema for evaluating an agent's problem-solving process."""
    task_completion_score: int = Field(description="Score 1-10 on task completion.")
    process_efficiency_score: int = Field(description="Score 1-10 on the efficiency and directness of the agent's process.")
    justification: str = Field(description="A brief justification for the scores.")
Khi được đánh giá, agent Lập kế hoạch tỏa sáng ở tính trực tiếp của nó.
--- Evaluating Planning Agent's Process ---
{
    'task_completion_score': 8,
    'process_efficiency_score': 9,
    'justification': "The agent created a clear, optimal plan upfront and executed it without any unnecessary steps. Its process was highly direct and efficient for this predictable task."
}
Chúng ta đang nhận được điểm số tốt, điều đó có nghĩa là phương pháp của chúng ta đã tạo ra một hệ thống lập kế hoạch chính xác, vì vậy…
khi con đường giải quyết có thể dự đoán được, Lập kế hoạch cung cấp một phương pháp có cấu trúc và hiệu quả hơn so với một phương pháp hoàn toàn phản ứng.
PEV (Người lập kế hoạch-Người thực thi-Người xác minh)
Agent Lập kế hoạch của chúng ta hoạt động tốt khi con đường rõ ràng, nó lập kế hoạch và tuân theo nó. Nhưng có một giả định ngầm…
điều gì sẽ xảy ra khi mọi thứ đi sai hướng? Nếu một công cụ thất bại, một API bị sập, hoặc tìm kiếm trả về rác, một người lập kế hoạch tiêu chuẩn chỉ chuyển lỗi đi, kết thúc bằng thất bại hoặc vô nghĩa.
Kiến trúc PEV (Planner-Executor-Verifier) là một bản nâng cấp đơn giản nhưng mạnh mẽ cho mẫu Lập kế hoạch, bổ sung một lớp kiểm soát chất lượng và tự sửa lỗi quan trọng.
PEV rất quan trọng để xây dựng các quy trình làm việc mạnh mẽ và đáng tin cậy. Bạn sử dụng nó ở bất cứ đâu một agent tương tác với các công cụ bên ngoài có thể không đáng tin cậy.
Đây là cách nó hoạt động…
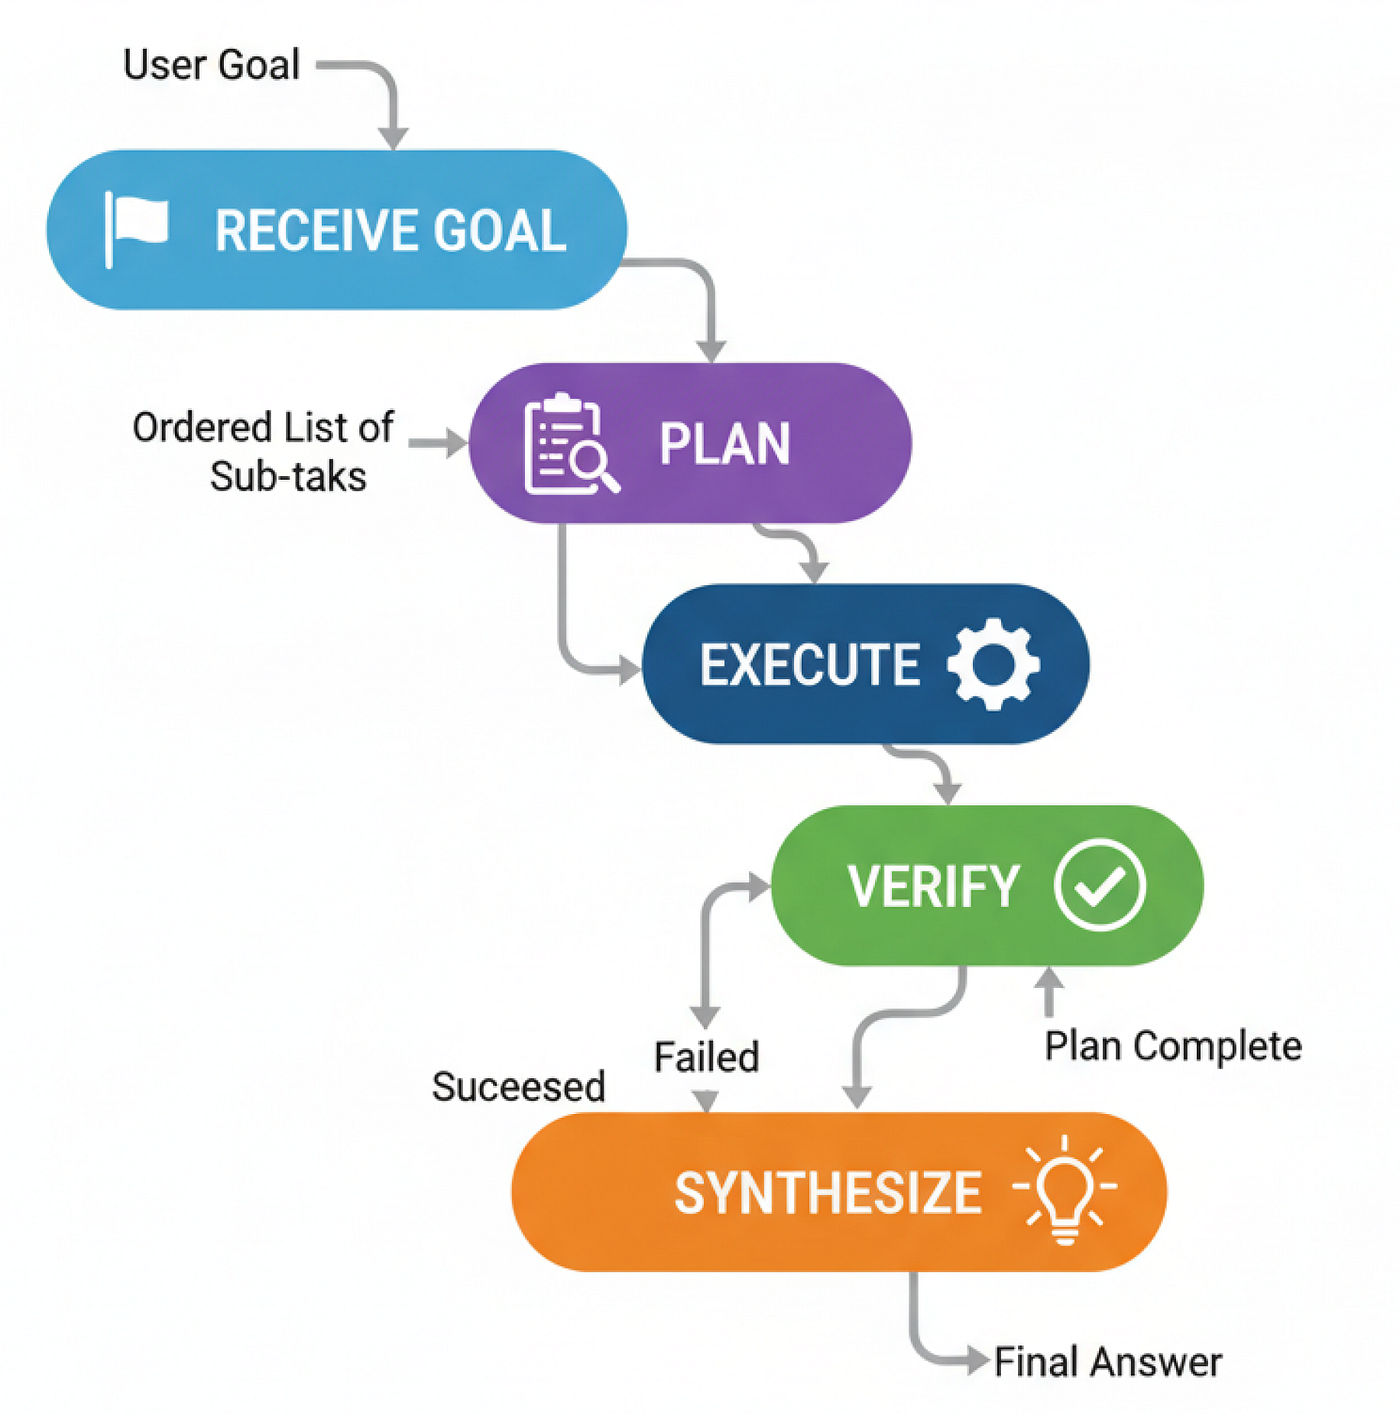 PEV (Tạo bởi Fareed Khan)
- Nếu bước thành công, agent sẽ chuyển sang bước tiếp theo trong kế hoạch.
- Nếu bước thất bại, agent sẽ quay trở lại Người lập kế hoạch để tạo một kế hoạch mới, giờ đây đã nhận thức được sự thất bại.
- Nếu kế hoạch hoàn tất, nó sẽ tiến đến cuối.
Để thực sự thể hiện điều này, chúng ta cần một công cụ thực sự có thể thất bại. Vì vậy, chúng ta sẽ tạo một công cụ flaky_web_search đặc biệt mà chúng ta sẽ thiết kế để cố tình trả về một thông báo lỗi cho một truy vấn cụ thể.
def flaky_web_search(query: str) -> str:
    """A web search tool that intentionally fails for a specific query."""
    console.print(f"--- TOOL: Searching for '{query}'... ---")
    if "employee count" in query.lower():
        console.print("--- TOOL: [bold red]Simulating API failure![/bold red] ---")
        return "Error: Could not retrieve data. The API endpoint is currently unavailable."
    else:
        return search_tool.invoke({"query": query})
Bây giờ đến phần cốt lõi của mẫu PEV: verifier_node. Công việc duy nhất của node này là xem xét đầu ra của công cụ cuối cùng và quyết định xem đó là thành công hay thất bại.
class VerificationResult(BaseModel):
    """Schema for the Verifier's output."""
    is_successful: bool = Field(description="True if the tool execution was successful and the data is valid.")
    reasoning: str = Field(description="Reasoning for the verification decision.")

def verifier_node(state: PEVState):
    """Checks the last tool result for errors."""
    console.print("--- VERIFIER: Checking last tool result... ---")
    verifier_llm = llm.with_structured_output(VerificationResult)
    prompt = f"Verify if the following tool output is a successful, valid result or an error message. The task was '{state['user_request']}'.\n\nTool Output: '{state['last_tool_result']}'"
    verification = verifier_llm.invoke(prompt)
    console.print(f"--- VERIFIER: Judgment is '{'Success' if verification.is_successful else 'Failure'}' ---")
    if verification.is_successful:
        return {"intermediate_steps": state["intermediate_steps"] + [state['last_tool_result']]}
    else:
        # If it failed, we add the failure reason and clear the plan to trigger re-planning
        return {"plan": [], "intermediate_steps": state["intermediate_steps"] + [f"Verification Failed: {state['last_tool_result']}"]}
Với người xác minh đã sẵn sàng, chúng ta có thể kết nối toàn bộ đồ thị. Chìa khóa ở đây là logic bộ định tuyến. Sau khi verifier_node chạy, nếu kế hoạch đột nhiên trống (vì người xác minh đã xóa nó), bộ định tuyến của chúng ta biết phải gửi agent trở lại planner_node để thử lại.
class PEVState(TypedDict):
    user_request: str
    plan: Optional[List[str]]
    last_tool_result: Optional[str]
    intermediate_steps: List[str]
    final_answer: Optional[str]
    retries: int

# ... (planner_node, executor_node, and synthesizer_node definitions are similar to before) ...
def pev_router(state: PEVState):
    """Routes execution based on verification and plan status."""
    if not state["plan"]:
        # Check if the plan is empty because verification failed
        if state["intermediate_steps"] and "Verification Failed" in state["intermediate_steps"][-1]:
            console.print("--- ROUTER: Verification failed. Re-planning... ---
Theo dõi trên X